
Are you looking for a fun, delicious, and slightly spooky treat to make this Halloween? Look no further than Halloween Monster Cookies! These colorful, gooey cookies are perfect for parties, trick-or-treating, or simply satisfying your Halloween sweet tooth. With an assortment of candy eyes, colorful chocolate chips, and vibrant sprinkles, these cookies will be a showstopper on your dessert table. Plus, they’re easy to make, so gather the family and have some fun in the kitchen creating your own delicious monsters!
Read on to discover the full recipe, tips for perfecting your monster cookies, and creative ways to customize them.

What are Halloween Monster Cookies?
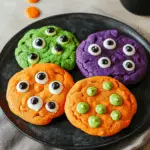
Halloween Monster Cookies are a festive twist on traditional cookies, packed with colorful candies, chocolate chips, and decorated with candy eyeballs to give them a “monster” look. These cookies are typically made with a peanut butter-oatmeal cookie base for a soft, chewy texture, but you can easily adapt the recipe to suit your preferences. Whether you like them gooey with melty chocolate or packed with crunch from M&M’s and sprinkles, monster cookies are a fun, customizable treat that’s as exciting to look at as it is to eat!
These cookies get their monster-like appearance from being studded with googly candy eyes, creating the perfect spooky effect for Halloween.
Ingredients List for Halloween Monster Cookies
For the Cookie Dough:
- Unsalted Butter (½ cup, softened): This adds richness and a chewy texture to your cookies.
- Peanut Butter (½ cup, creamy or chunky): A classic ingredient in monster cookies, giving them a rich flavor and moist texture.
- Granulated Sugar (½ cup): For sweetness and that perfect cookie crunch.
- Brown Sugar (¾ cup, packed): Adds a deeper, caramel-like flavor and helps the cookies stay moist.
- Eggs (2 large): Helps bind the ingredients and provides structure.
- Vanilla Extract (1 teaspoon): Enhances the flavor of the cookies.
- All-Purpose Flour (1 ½ cups): The base of your cookie dough.
- Old-Fashioned Rolled Oats (1 cup): Adds texture and makes the cookies more substantial.
- Baking Soda (1 teaspoon): Helps the cookies rise and keeps them light.
- Salt (¼ teaspoon): Balances the sweetness and enhances flavor.
For the Monster Decorations:
- Mini M&M’s or Halloween-Themed M&M’s (1 cup): For bursts of color and chocolatey goodness in each bite.
- Chocolate Chips (1 cup, semi-sweet or milk chocolate): Adds a classic chocolatey flavor and texture.
- Candy Eyes (various sizes): The key decoration for making your cookies look like monsters!
- Sprinkles (optional): Halloween-themed sprinkles can add even more festive flair to your cookies.
Substitutions and Variations for Halloween Monster Cookies
One of the best things about Halloween Monster Cookies is how flexible they are! You can easily adapt the recipe to fit your dietary needs or flavor preferences. Here are a few ideas:
- Peanut Butter Substitutes: If you have a peanut allergy, try using almond butter, sunflower seed butter, or a similar nut-free alternative. These substitutes will still give you the creamy texture without the allergens.
- Oatmeal-Free Version: If you prefer a more traditional cookie texture without oats, simply leave them out and increase the flour by about ½ cup to compensate.
- Gluten-Free Option: Substitute the all-purpose flour with a 1-to-1 gluten-free flour blend, and make sure to use certified gluten-free oats.
- Dairy-Free: Use plant-based butter (like coconut oil or margarine) and dairy-free chocolate chips to make this recipe suitable for dairy-free diets.
- Monster Shapes: If you want to create actual monster shapes instead of round cookies, use cookie cutters or shape the dough into monster faces by hand. Decorate them with candy eyes, mouths made from chocolate chips, and sprinkles for extra personality!
Now that you have the list of ingredients and variations, let’s dive into the fun part—making these spooky cookies!
Step-by-Step Cooking Instructions for Halloween Monster Cookies

Step 1: Preheat the Oven
Preheat your oven to 350°F (175°C). Line two baking sheets with parchment paper or silicone baking mats to prevent the cookies from sticking.
Step 2: Mix the Wet Ingredients
In a large mixing bowl, combine the softened butter, peanut butter, granulated sugar, and brown sugar. Use a hand mixer or stand mixer to beat these ingredients together until they’re light and fluffy, about 2-3 minutes. Add the eggs and vanilla extract, and continue beating until well incorporated.
Step 3: Add the Dry Ingredients
In a separate bowl, whisk together the flour, baking soda, salt, and rolled oats. Gradually add the dry mixture to the wet ingredients, mixing on low speed until just combined. Be careful not to overmix the dough, as this can result in tough cookies.
Step 4: Fold in the Candy and Chocolate
Using a spatula, fold in the mini M&M’s and chocolate chips. Save a handful of M&M’s and chocolate chips to press on top of the cookies before baking, so they’re extra colorful and packed with flavor!
Step 5: Shape the Cookies
Scoop about 2 tablespoons of dough for each cookie and roll them into balls. Place the cookie dough balls onto the prepared baking sheets, leaving about 2 inches of space between each one, as the cookies will spread during baking.
Step 6: Decorate with Candy Eyes
Before baking, press candy eyes of various sizes into the tops of each cookie dough ball. Feel free to get creative—add one eye for a cyclops monster or several for a googly-eyed creature! If you’re using sprinkles, sprinkle them over the dough at this stage.
Step 7: Bake the Cookies
Bake the cookies in the preheated oven for 10-12 minutes, or until the edges are lightly golden but the centers are still soft. Be careful not to overbake, as the cookies will continue to firm up as they cool.
Step 8: Cool and Serve
Remove the cookies from the oven and allow them to cool on the baking sheets for 5 minutes before transferring them to a wire rack to cool completely. Once cooled, serve your spooky Halloween Monster Cookies and watch as your guests devour these monster creations!
How to Cook Halloween Monster Cookies: A Step-by-Step Guide
Making Halloween Monster Cookies is all about having fun with the decorating process. Here’s a summary of the essential steps to ensure your cookies turn out perfectly:
- Mix the wet ingredients: Cream together the butter, peanut butter, and sugars until light and fluffy.
- Add the dry ingredients: Incorporate the flour, oats, and baking soda into the dough without overmixing.
- Fold in the candy: Stir in colorful M&M’s, chocolate chips, and any other mix-ins you’d like.
- Shape and decorate: Roll the dough into balls, press candy eyes into the dough, and add sprinkles for extra fun.
- Bake to perfection: Bake the cookies until the edges are golden but the centers remain soft.
Common Mistakes to Avoid When Making Halloween Monster Cookies
Even though these cookies are easy to make, a few common mistakes can impact the final result. Avoid these pitfalls to ensure your Halloween Monster Cookies turn out delicious and festive:
- Overmixing the dough: Overmixing can lead to tough, dense cookies. Mix the dry ingredients into the wet just until combined for a softer, chewier cookie.
- Overbaking: Cookies can continue baking on the hot baking sheet even after they’re removed from the oven, so take them out when they’re still slightly soft in the center to prevent overbaking.
- Not spacing the cookies: These cookies spread a lot, so make sure to leave enough room between them on the baking sheet to avoid them melding into one large monster cookie.
Serving and Presentation Tips for Halloween Monster Cookies
Halloween Monster Cookies are as fun to serve as they are to make! Here are some ideas for presenting them in a festive way:
- Monster Platter: Arrange your cookies on a Halloween-themed platter or tray, and scatter candy eyeballs, gummy worms, or plastic spiders around them for an extra spooky touch.
- Cookie Monster Bags: Package each cookie in clear cellophane bags tied with orange and black ribbons. Perfect for trick-or-treating or party favors!
- Halloween Dessert Table: Set up a dessert table with your Monster Cookies as the centerpiece. Surround them with other Halloween treats like candy corn, caramel apples, and cupcakes topped with Halloween-themed decorations.
How to Serve Halloween Monster Cookies
Serve Halloween Monster Cookies warm or at room temperature. They’re perfect for:
- Halloween Parties: These cookies are sure to be a hit at any Halloween gathering.
- Trick-or-Treaters: Pack them into small treat bags for a homemade alternative to store-bought candy.
- Lunchbox Treats: Add a spooky cookie to your child’s lunchbox for a fun Halloween surprise.
You can also serve them alongside a glass of cold milk or a cup of hot cocoa for the ultimate cozy Halloween treat!
Presentation Ideas for Halloween Monster Cookies
Take your Halloween Monster Cookies to the next level with these presentation ideas:
- Monster Cookie Jar: Fill a large glass jar with your monster cookies and place it at the center of your Halloween dessert table.
- Spooky Tiered Stand: Arrange the cookies on a tiered stand with Halloween decorations like mini pumpkins, fake cobwebs, and toy bats to create a spooky cookie display.
- Eyeball Tray: Place the cookies on a tray surrounded by candy eyeballs to emphasize the monster theme.
Halloween Monster Cookies Recipe Tips
- Freeze the Dough: You can make the cookie dough ahead of time and freeze it for later. Simply roll the dough into balls, freeze on a baking sheet, and transfer to a freezer-safe bag. When ready to bake, add an extra minute or two to the baking time.
- Double the Recipe: These cookies disappear fast, so consider doubling the recipe if you’re baking for a large group!
- Candy Eye Placement: For the best monster effect, press the candy eyes into the dough after rolling the cookies into balls but before baking. The eyes will stay in place without melting into the dough.
Frequently Asked Questions (FAQs)
Q: Can I make these cookies without peanut butter?
A: Yes! You can substitute the peanut butter with almond butter, sunflower seed butter, or even omit it entirely. Just add an extra tablespoon or two of butter if you leave out the nut butter.
Q: How long do these cookies stay fresh?
A: Store the cookies in an airtight container at room temperature for up to 5 days. For longer storage, you can freeze them for up to 3 months.
Q: Can I use quick oats instead of rolled oats?
A: Yes, but quick oats will give the cookies a slightly different texture. Rolled oats are preferred for their chewiness, but quick oats will still work in a pinch.
Conclusion
Halloween Monster Cookies are the ultimate spooky, fun, and delicious treat for the Halloween season. Whether you’re hosting a party, making treats for trick-or-treaters, or just looking for a fun kitchen activity with the family, these cookies are sure to bring smiles (and maybe a few screams!). With candy eyes, colorful mix-ins, and endless decorating options, this recipe allows for tons of creativity.
So grab your ingredients, get the oven ready, and unleash your inner mad scientist as you bake these delicious Halloween Monster Cookies!
PrintHalloween Monster Cookies Recipe
Halloween monster cookies are a delightful and fun treat for Halloween parties, using colorful candy, googly eyes, and vibrant sprinkles to create spooky cookie monsters. Made with a simple cookie dough base, these cookies are easy to bake and decorate with a variety of toppings, making them a hit with both kids and adults. With their bright colors and playful appearance, they’re the perfect addition to any Halloween celebration.
- Prep Time: 20 minutes
- Cook Time: 12 minutes
- Total Time: 32 minutes
- Yield: 24 cookies
- Category: Dessert, Cookies
- Method: Baking
- Cuisine: American
- Diet: Vegetarian
Ingredients
- 2 ¼ cups all-purpose flour
- ½ tsp baking soda
- 1 cup unsalted butter, softened
- ½ cup granulated sugar
- 1 cup brown sugar, packed
- 2 large eggs
- 2 tsp vanilla extract
- 1 ½ cups chocolate chips or M&M’s
- Candy eyes
- Assorted sprinkles or candy decorations
Instructions
- Preheat oven to 350°F (175°C). Line baking sheets with parchment paper.
- In a bowl, whisk together flour and baking soda.
- In a separate bowl, cream together butter, granulated sugar, and brown sugar until light and fluffy.
- Add eggs one at a time, beating well after each addition. Stir in vanilla extract.
- Gradually mix in the flour mixture until combined. Fold in chocolate chips or M&M’s.
- Scoop dough onto baking sheets. Slightly flatten each dough ball with your palm.
- Bake for 10-12 minutes until edges are golden brown.
- Remove from oven and quickly press candy eyes into the cookies while they’re still warm.
- Decorate with sprinkles or candy while cookies are cooling.
Notes
- For a more colorful look, use vibrant food coloring in the dough.
- These cookies can be stored in an airtight container for up to a week.
Nutrition
- Serving Size: 1 cookie
- Calories: 180
- Sugar: 16g
- Sodium: 80mg

Leave a Reply