
There’s something nostalgic and irresistible about the flavor of a creamsicle—sweet citrus and vanilla cream dancing together in perfect harmony. This Jello Creamsicle Pie captures all that magic in a cool, creamy, no-bake dessert that’s as dreamy as summer itself.
I discovered this recipe when I needed a last-minute dessert for a potluck and had little more than a box of orange Jello and a tub of Cool Whip. The result? A pie so light, refreshing, and crowd-pleasing that it disappeared before I could blink. It's now a staple in my recipe box, especially during warm-weather months.
Let’s dive into why you’re going to fall in love with this cheerful, creamy creation.
Why You’ll Love This Jello Creamsicle Pie
Get ready to add a new favorite to your no-bake dessert lineup. This Jello Creamsicle Pie is everything a summer treat should be—easy, breezy, and absolutely delightful.
First of all, it’s incredibly easy to make. With just a few ingredients and no oven required, it’s perfect for beginner bakers or anyone avoiding the heat of the stove. Most of the work is hands-off, letting your fridge do the magic.
It’s the ideal make-ahead dessert. Since it needs to chill for a few hours anyway, it’s great for prepping the night before a party or gathering. You’ll thank yourself when dessert is ready and waiting, no stress involved.
This pie is refreshingly light. The combination of whipped topping and orange gelatin gives it a mousse-like texture that melts in your mouth—perfect after a big meal or on a hot day.
Best of all, it’s incredibly budget-friendly. Most ingredients are pantry or fridge staples, and you can easily whip up the entire pie for under $10. Fancy taste, simple price.
Ready to learn what goes into this deliciously creamy dream? Let’s look at the ingredients that make it sing.
Ingredient Notes

This pie keeps things simple without skimping on flavor. Each ingredient plays an important role in delivering that signature creamsicle taste.
The base of the pie starts with orange Jello, the star of the show. Its bold, citrusy flavor brings the “orange” in creamsicle to life. You’ll dissolve it in boiling water to intensify the flavor and help it blend smoothly with the other ingredients.
Next, you’ll mix in vanilla ice cream, slightly softened. This is where the magic happens—when the cold ice cream hits the warm Jello mixture, it cools everything down quickly and starts to set the pie. The vanilla adds that creamy counterpoint to the citrus, mimicking the classic creamsicle combo.
Whipped topping like Cool Whip adds fluffiness and structure. Folded in once the Jello and ice cream are mixed, it lightens the texture and gives the pie its dreamy, mousse-like consistency. For best results, make sure your topping is fully thawed.
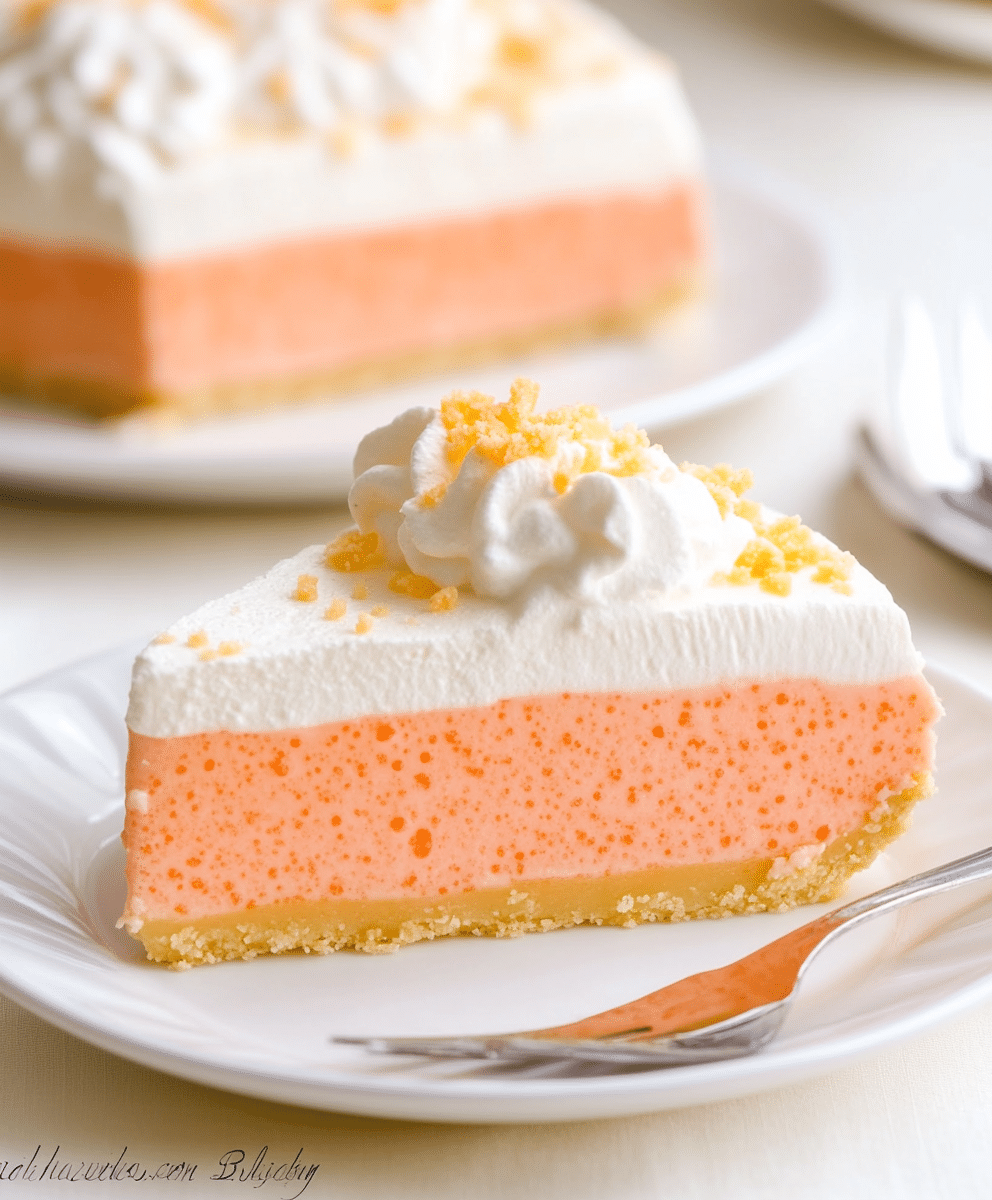
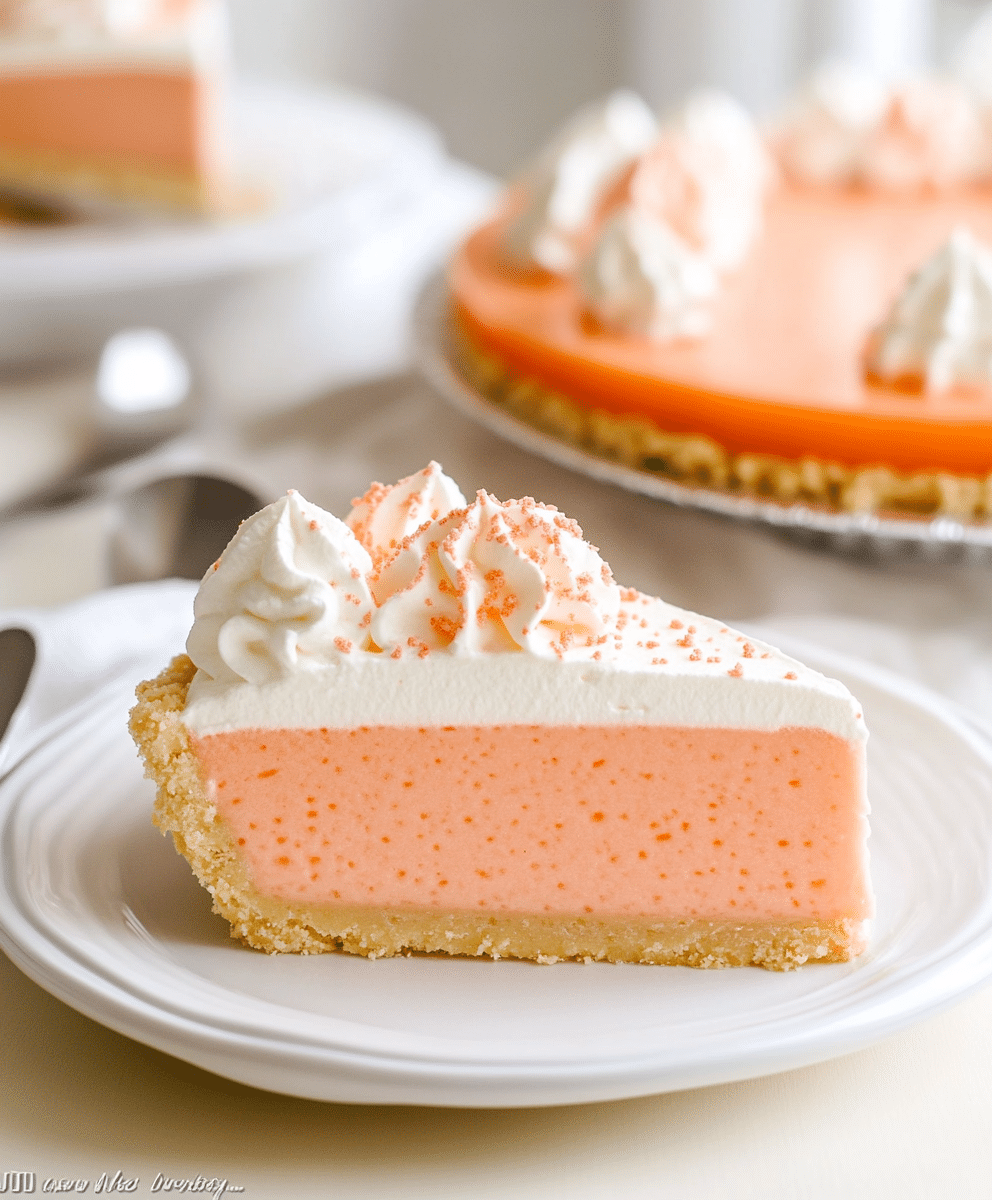
To hold everything together, you’ll use a graham cracker crust. Store-bought works perfectly for a quick fix, or you can make your own if you prefer a homemade touch. The slight crunch and buttery flavor of the crust balance out the creamy filling beautifully.
You won’t need any fancy gadgets to pull this together—just a mixing bowl, a whisk, and a spoon. A rubber spatula makes folding in the whipped topping even easier, and a pie plate if you’re making your own crust.
How to Make This Jello Creamsicle Pie
Making this pie is about as easy as it gets. It’s a fantastic recipe for involving kids or for those days when you want something sweet without much effort.
Start by boiling water and whisking in the orange Jello powder until it’s completely dissolved. This step is key—undissolved Jello won’t mix smoothly and can affect the texture. Stir slowly and patiently for the best results.
Once the Jello is dissolved, add scoops of slightly softened vanilla ice cream right into the warm liquid. Stir gently until the ice cream melts completely into the mixture. This both cools the Jello and begins to thicken it slightly—plus, it smells amazing.
Let the mixture sit for 5–10 minutes to cool further before adding the whipped topping. When it’s no longer hot but still pourable, fold in the whipped topping carefully. You want to keep the mixture light and airy, so use a gentle hand.
Pour the mixture into your graham cracker crust and smooth out the top. It will still be somewhat liquid at this stage—that’s exactly what you want. Refrigerate the pie for at least 4 hours, or until fully set. Overnight chilling works great too if you’re prepping in advance.
Once set, the pie will be firm but silky. Serve it chilled with an optional dollop of whipped cream or a few mandarin orange slices on top for a fresh, fruity touch.
Storage Options
This pie is a fantastic make-ahead dessert and stores beautifully. After chilling and slicing, any leftover pieces can be kept in the refrigerator for 4 to 5 days. Make sure to cover the pie dish tightly with plastic wrap or transfer slices to an airtight container.
If you're planning ahead for a party or want to freeze individual portions, this pie can also be frozen. Wrap the whole pie (or slices) tightly in plastic wrap followed by foil, and freeze for up to one month. Thaw in the fridge for several hours before serving.
When reheating isn’t needed, dessert gets even easier. But if you’ve frozen a slice and it’s a bit too firm straight from the freezer, just let it sit at room temperature for 10–15 minutes to soften slightly before enjoying.
Variations and Substitutions
One of the best parts of this pie is how customizable it is. Once you’ve mastered the base, you can experiment with all sorts of delicious twists.
Try swapping the orange Jello for lemon, raspberry, or strawberry to create new flavor profiles. Lemon and vanilla create a bright, sunshiney version, while raspberry gives it a berries-and-cream vibe.
Use different ice cream flavors like peach, coconut, or even sherbet for a unique take. Each new pairing brings a fresh perspective to the classic formula.
If you’re avoiding dairy, opt for a non-dairy whipped topping and use a dairy-free vanilla frozen dessert in place of traditional ice cream. You’ll still get that luscious texture without compromising on dietary preferences.
The crust can also be switched up—try a vanilla wafer crust or a shortbread cookie base for something extra indulgent. Even a chocolate crust can be fun if you love the orange-chocolate combo.
Once you’ve made it once, don’t be afraid to make it your own. This pie is forgiving, flexible, and most of all, fun to play with.
PrintJello Creamsicle Pie Recipe

This Jello Creamsicle Pie blends creamy whipped topping, vibrant orange Jello, and sweet condensed milk in a delicious graham cracker crust. It's a refreshing and simple dessert perfect for warm weather or holidays. This no-bake pie recipe is ideal for summer gatherings, BBQs, or whenever you crave a nostalgic orange creamsicle flavor. Keywords: Jello pie, orange creamsicle dessert, no-bake pie, summer dessert, easy pie recipe, quick dessert, orange jello pie.
- Prep Time: 10 minutes
- Cook Time: 0 minutes
- Total Time: 4 hours 10 minutes (including chilling time)
- Yield: 8 servings
- Category: Dessert
- Method: No-Bake
- Cuisine: American
- Diet: Vegetarian
Ingredients
-
1 package (3 oz) orange Jello
-
½ cup boiling water
-
½ cup cold water
-
1 can (14 oz) sweetened condensed milk
-
1 tub (8 oz) whipped topping (Cool Whip), thawed
-
1 pre-made graham cracker pie crust
-
Optional: orange zest or mandarin slices for garnish
Instructions
-
In a mixing bowl, dissolve orange Jello in boiling water. Stir for 2 minutes.
-
Add cold water and mix. Let the Jello cool for about 10 minutes.
-
Stir in sweetened condensed milk until fully blended.
-
Gently fold in whipped topping until smooth and creamy.
-
Pour the mixture into the graham cracker crust and spread evenly.
-
Refrigerate for at least 4 hours or until set.
-
Garnish with orange zest or mandarin slices if desired before serving.
Notes
-
You can substitute different Jello flavors for fun variations.
-
For a stronger citrus kick, add 1 tablespoon of orange juice concentrate.
-
Keeps well in the fridge for up to 3 days.
Nutrition
- Serving Size: 1 slice (⅛th pie)
- Calories: 290
- Sugar: 28g
- Sodium: 170mg

Leave a Reply